
The Problem
You are reviewing a running web app. A heading has the wrong color, a price needs updating, a button label is off. The traditional workflow: open DevTools, find the element, note the CSS class, search your codebase, locate the file, make the change. Repeat for every issue. If you are working with a designer or product owner, they screenshot the page, draw arrows in Figma or a PDF, and you spend time mapping their visual feedback back to source code.
We wanted something faster: point at it, type what is wrong, let an AI agent fix it.
What Redline Does
Redline is a Claude Code skill with two modes:
/redline setupinstalls a lightweight annotation overlay into any web project (React, Vue, Svelte, plain HTML, Tauri)/redline filename.jsonreads an annotation file and fixes all annotated issues in the codebase
The overlay runs entirely in the browser, requires zero npm dependencies, and works with any framework. The annotation file is a simple JSON that Claude Code reads to locate elements and apply fixes.
Setup
Running /redline setup in Claude Code does three things:
- Detects your project type and HTML entry point (checks
index.html,src/index.html,public/index.html,app/layout.tsx, etc.) - Copies a self-contained
dev/annotation-overlay.jsinto your project - Adds a dev-only script tag before
</body>
<!-- Redline: dev-only annotation overlay -->
<script data-dev-only src="/dev/annotation-overlay.js"></script>
The overlay file is committed to your repo so the whole team can use it. Annotation output files go into .claude/redline/, which is gitignored.
Demo Walkthrough
We will walk through a full annotation cycle using a simple shop demo page.
The Original Page
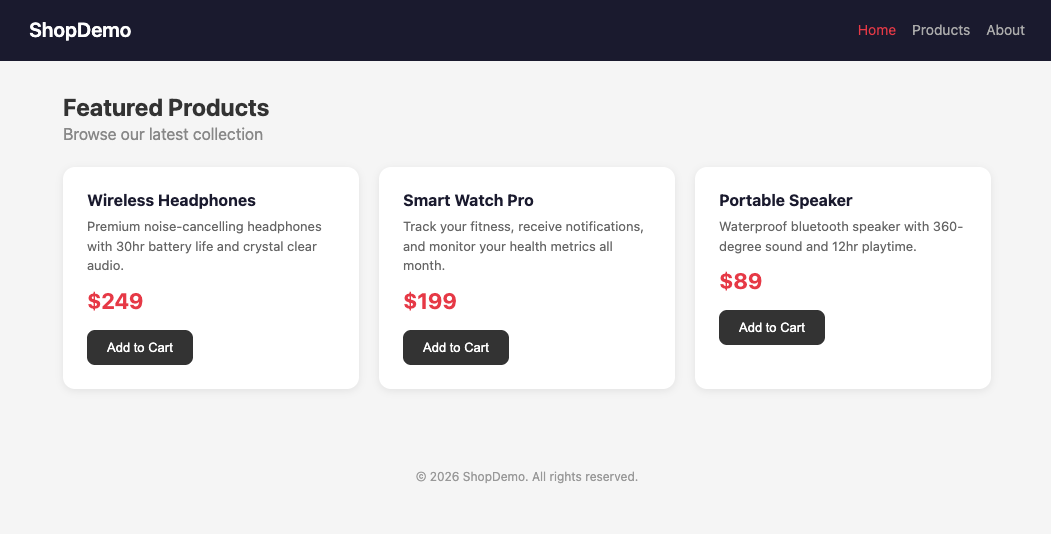
Here is our starting point — a clean product listing with three cards:
Activating the Overlay
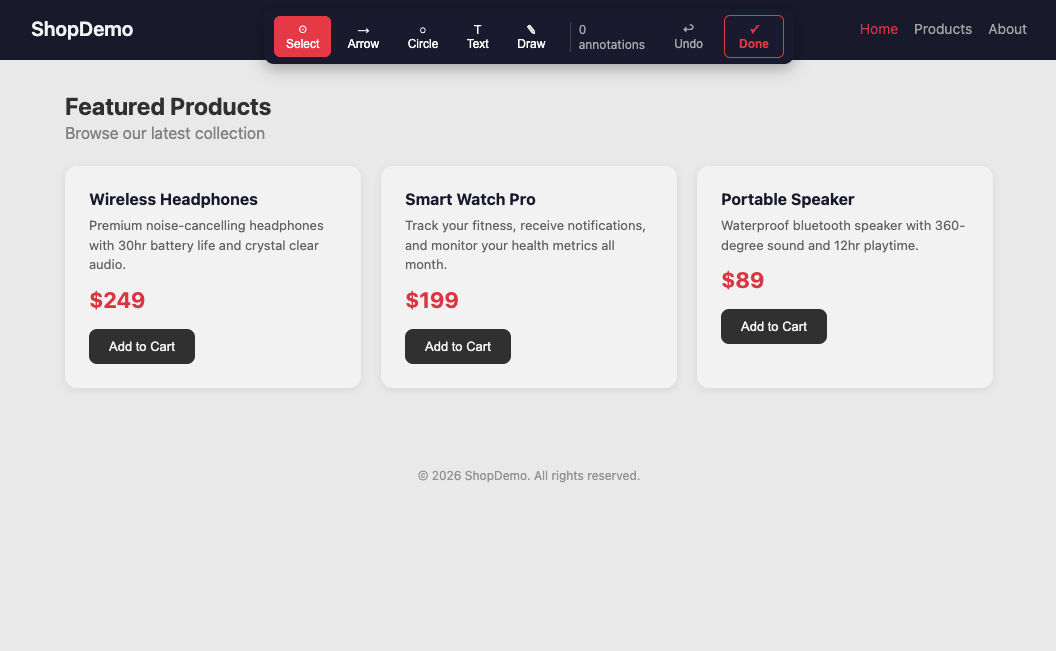
Press Cmd+Shift+A (Mac) or Ctrl+Shift+A (Windows/Linux). A toolbar appears at the top of the page with drawing tools: Select, Arrow, Circle/Box, Text, and Freehand.
Annotating Elements
Click an element with the Select tool to highlight it, then type your feedback. For example, clicking the heading and typing "make text blue":
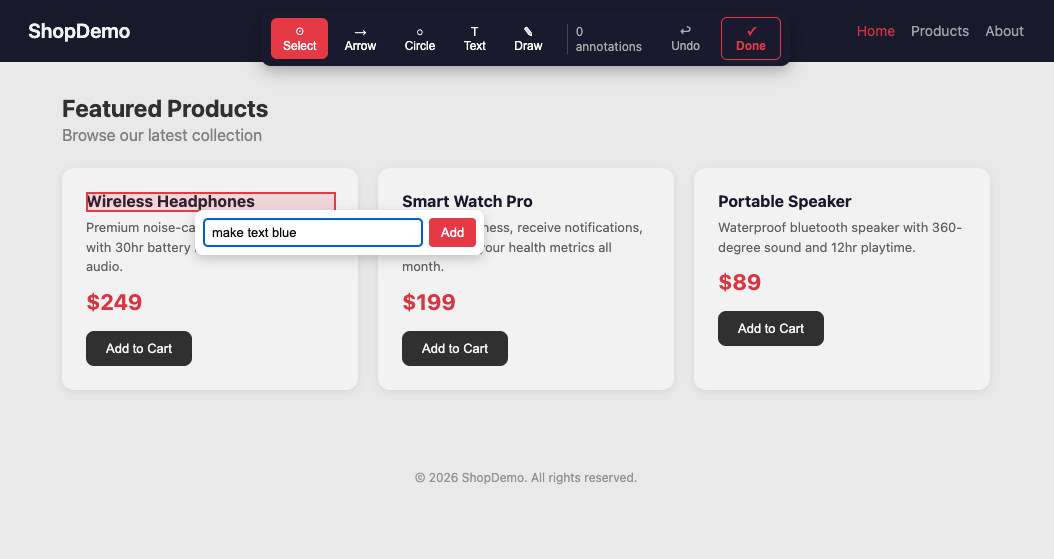
You can also draw arrows pointing to elements, circle areas of interest, or place text labels. Each drawing tool automatically prompts for a comment so the AI knows what to fix.
Multiple Annotations
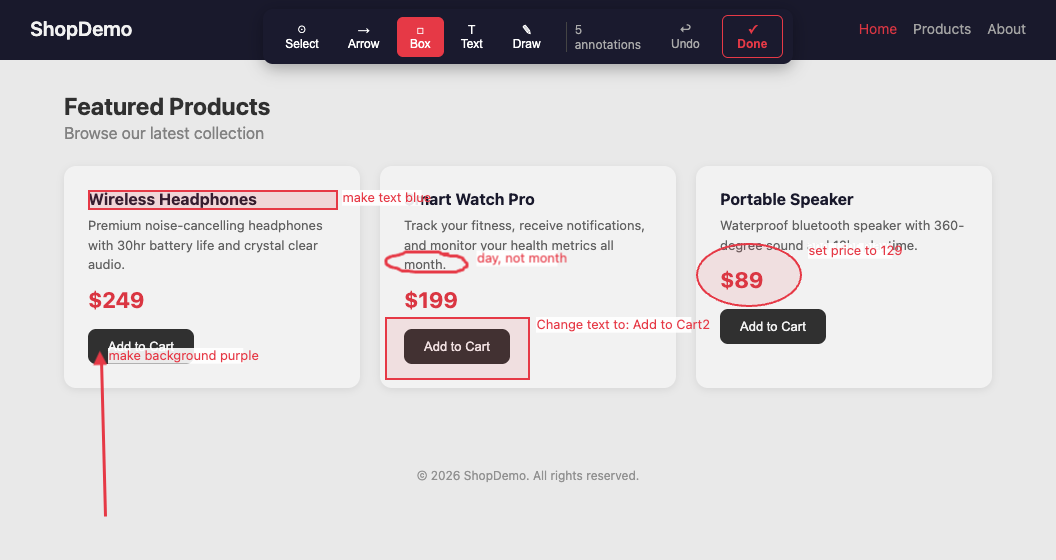
Keep annotating. Here we have marked five changes: a color change on the heading, a purple background for the first card, a price correction, a text fix, and a button label change:
Finishing and Saving
Press Cmd+Shift+A again or click Done. The overlay saves a JSON file to your Downloads folder and copies the filename to your clipboard. The JSON captures each annotation with its CSS selector, comment, element metadata, and position:
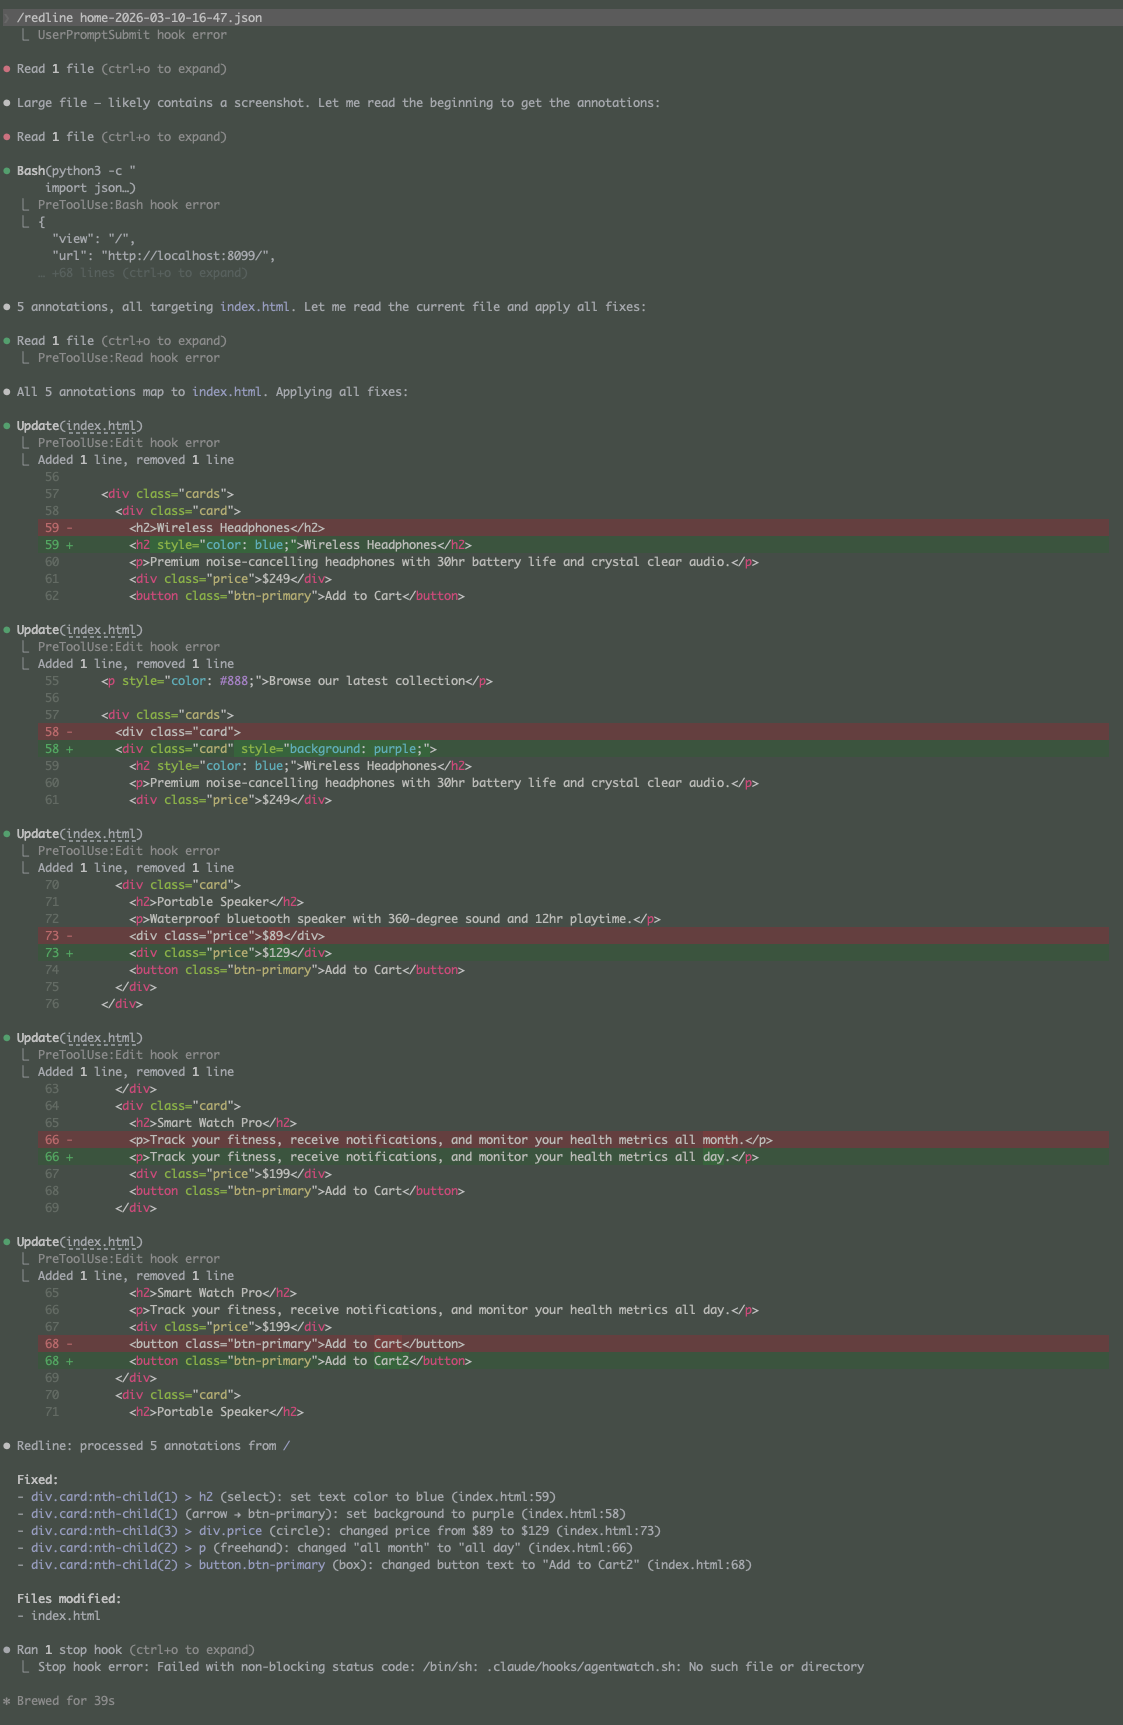
Applying the Fixes
Paste the filename into Claude Code:
/redline home-2026-03-10-16-47.jsonClaude reads the JSON, maps each selector to the source file, interprets the comment, and applies the fix. The result:
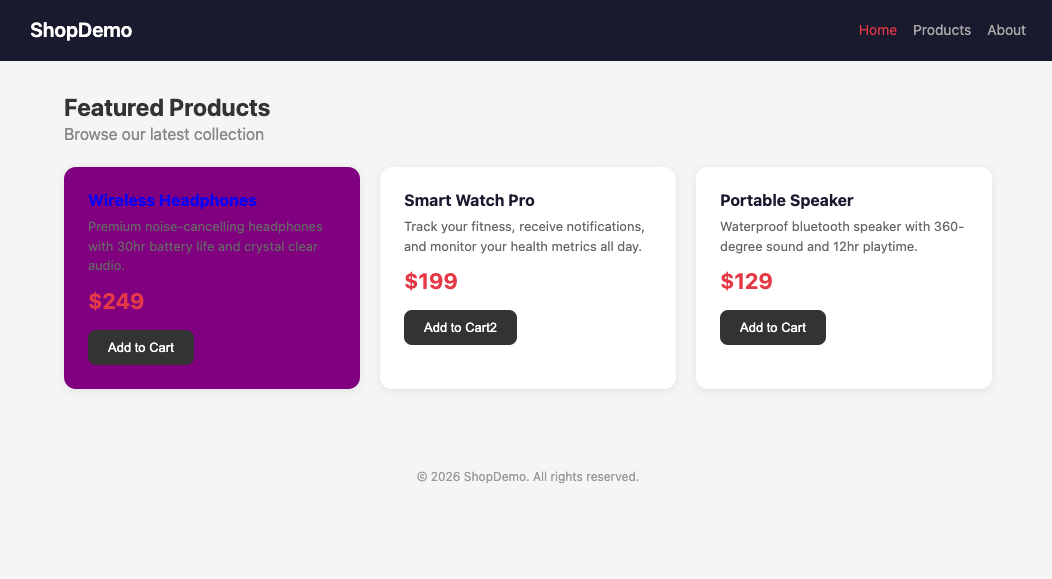
All five annotations were processed and applied to index.html in one pass.
How It Works Under the Hood
The overlay is roughly 600 lines of vanilla JavaScript that loads Fabric.js from a CDN for canvas drawing.
Element Detection
When you click the canvas, the overlay needs to know which DOM element is underneath. It temporarily hides the canvas and toolbar, calls document.elementFromPoint(), then restores them:
function getElementUnderPoint(x, y) {
  var canvasWrapper = fabricCanvas.wrapperEl;
  canvasWrapper.style.pointerEvents = 'none';
  if (toolbarEl) toolbarEl.style.pointerEvents = 'none';
  var element = document.elementFromPoint(x, y);
  canvasWrapper.style.pointerEvents = prevWrapper;
  if (toolbarEl) toolbarEl.style.pointerEvents = prevToolbar;
  return element;
}
CSS Selector Generation
To tell Claude Code exactly which element was annotated, the overlay generates a unique CSS selector. It walks up the DOM tree, collecting tag names and class names. When siblings share the same tag and class, it adds :nth-child() for disambiguation:
function getCssSelector(el) {
  if (el.id) return '#' + CSS.escape(el.id);
  const parts = [];
  let current = el;
  while (current && current !== document.body) {
    let seg = current.tagName.toLowerCase();
    if (current.className) {
      const classes = current.className.trim().split(/\s+/);
      seg += '.' + classes.map(c => CSS.escape(c)).join('.');
    }
    // Disambiguate siblings with same tag+class
    if (current.parentElement) {
      var siblings = Array.from(current.parentElement.children)
        .filter(s => s.tagName === current.tagName
          && s.className === current.className);
      if (siblings.length > 1) {
        var idx = Array.from(current.parentElement.children)
          .indexOf(current) + 1;
        seg += ':nth-child(' + idx + ')';
      }
    }
    parts.unshift(seg);
    current = current.parentElement;
  }
  return parts.join(' > ');
}
This produces selectors like div.card:nth-child(2) > div.price that are precise enough for Claude to find the right element even in repeated component patterns.
Drawing Tools with Linked Comments
Every drawing tool (arrow, circle, box, freehand) prompts for a comment after you finish drawing. The comment gets stored alongside the nearest DOM element. For arrows, the element under the arrowhead is used as the target. For circles and boxes, the center of the shape determines the target element. This linking is what makes the annotations actionable — Claude Code knows both what to change and where to change it.
The Annotation JSON
The final output is a flat JSON file:
{
  "view": "/",
  "url": "http://localhost:8099/",
  "timestamp": "2026-03-10T16:49:37.583Z",
  "annotations": [
    {
      "type": "select",
      "selector": "div.card:nth-child(1) > h2",
      "comment": "make text blue",
      "tagName": "H2",
      "text": "Wireless Headphones"
    },
    {
      "type": "arrow",
      "comment": "make background purple",
      "nearSelector": "div.card:nth-child(1) > button.btn-primary"
    }
  ]
}
Each annotation type carries enough context for the AI to locate and fix the element: the CSS selector, the comment describing the change, the tag name, classes, and a text preview.
How Claude Code Processes Annotations
When you run /redline filename.json, the skill:
- Finds the file in
~/Downloads/(the default browser download location) - Reads the annotations and groups them by source file
- For each annotation, searches the codebase by selector, class names, and text content to find the component or style file
- Interprets the comment and applies the minimal fix
- Dispatches parallel agents for annotations that map to different files
Ambiguous comments like "fix this" or "ugly" are flagged in the summary rather than guessed at. After processing, you get a summary of what was fixed and what needs clarification.
Design Decisions
A few choices we made during development:
- No npm dependencies. The overlay loads Fabric.js from a CDN. No install step, no build configuration, works in any project.
- Browser download for all platforms. We initially tried writing files directly to disk using Tauri's filesystem API, but simplified to standard browser downloads. This works identically in Tauri webviews and regular browsers.
- Filename to clipboard. After saving, the filename is copied to your clipboard. You paste it into Claude Code as
/redline filename.json. No path hunting. - Separate setup from processing.
/redline setupis a one-time command./redline file.jsonis the daily workflow. The processing mode never checks if the overlay is installed — it just reads the file and fixes code, keeping token usage low. - Framework-agnostic. The overlay is plain JavaScript injected via a script tag. It does not care whether you are using React, Vue, Svelte, or a static HTML page.
Get the Skill
Redline is available as a Claude Code skill at seedr.toolr.dev/skills/redline. Install it, run /redline setup in your project, and start annotating.